
LEGO studs on a USB-C dock: how DockFrame stacks, and why it wears Framework Desktop tiles
We had two hard requirements for the DockFrame enclosure beyond "hold the PCB and don't slide on the desk." It had to stack mechanically with another DockFrame so users could chain units. And the top surface had to swap between a stud field and a Framework Desktop tile face without re-tooling the case.
The result is a translucent PETG shell with LEGO-spec studs on the top and bottom, plus a thin clip-on frame that takes Framework Desktop tiles. Below is the engineering reasoning, plus a thank you to ForgeWork, who shipped us a set of their tiles to validate the frame against.
The LEGO interface
The studs aren't a styling choice. They are the cheapest mechanical interface that solves three open feedback items.

Vertical stacking for more slots. A lot of you want six or eight expansion slots, not four. A bigger main board is a separate (and expensive) design cycle. But if two DockFrames lock together physically, you can run them as a coupled pair today: USB-C tie cable between them, shared PD passthrough, and the bottom unit's studs locating into the top unit's underside. The grid is rigid in shear, the same reason a 4x6 plate doesn't twist on a baseplate.
Inheriting a million third-party parts. Pick the LEGO stud (8.0 mm pitch, 4.85 mm OD, 1.8 mm height) and you instantly inherit cable clips, phone arms, pen holders, vesa-style mounts and trays from every brick-compatible vendor on Earth. The patent expired in 1989, so the geometry is legal to clone, and it's been refined by every print farm on the planet.
A user-friendly DIY ramp. A lot of subscribers asked for "DIY enclosure files," "metal chassis option," "let me print my own." LEGO is the lowest-effort version of that. No printer, no CAD seat, no GitHub. You buy a $5 bag of bricks and you've personalized the dock at your kitchen table.
A few notes on the actual stud design, since this is where the prototype work lived:
■ Print tolerance offset. Injection-molded LEGO holds ±0.01 mm. A consumer FDM machine in PETG holds maybe ±0.15 mm. We model the stud at nominal LEGO geometry and then bias the OD down by 0.10 mm to account for elephant's foot and over-extrusion. Result: friction fit with real bricks, not a chocked-up press fit.
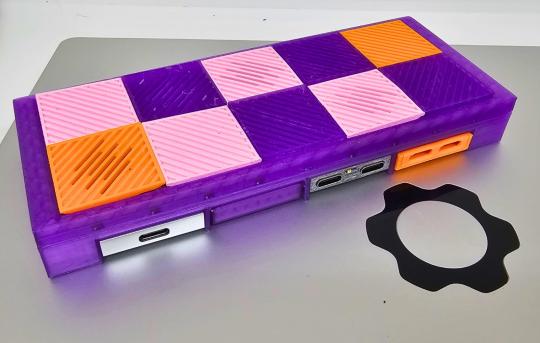
■ Anti-stud cavities on the bottom. The underside of the case has the inverse geometry, so the dock receives studs from below. That's what makes stacking work. Cylindrical posts with a tuned ID, not square pockets.
■ Stud grid aligned with the expansion-slot pitch. The studs sit on the 8 mm grid, and the Framework Expansion Card slot windows fall on stud-multiples so the top plate doesn't end on a half stud anywhere. Looks deliberate because it is.
■ Translucent PETG for the prototype. PETG was chosen over PLA for the obvious reason: USB-C ports run hot under PD load, and PLA softens uncomfortably close to where we want passive headroom. Translucent is just because it photographs well and shows the PCB underneath.
The studs are functional, not cosmetic. They hold load.
The Framework Desktop tile frame
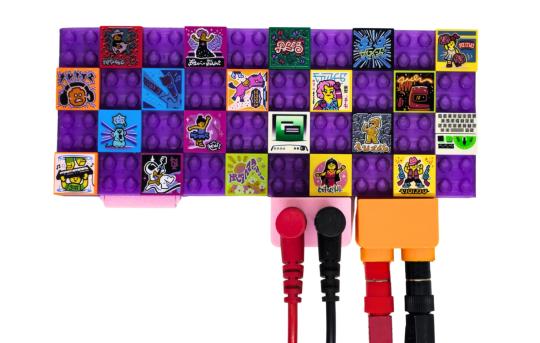
The other half is the clip-on tile frame. If you read Nirav's Framework Desktop launch post, you'll remember the front face of that machine is 21 swappable tiles in a 3-wide, 7-tall grid, and Framework released the tile geometry as open source. A small print-shop economy popped up around it almost overnight. ForgeWork is one of the better ones (more on them in a sec).
We wanted DockFrame to plug into that same tile format. Same outer dimensions per tile. Same retention features. So if you already own Framework Desktop tiles, they drop straight onto your dock. And if you 3D print your own, you only design once for both surfaces.
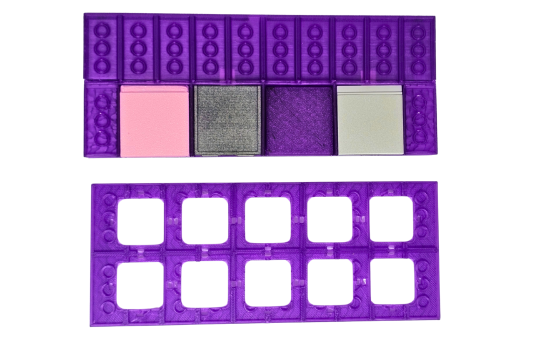
The frame itself is a thin part that registers over the LEGO studs. Two design decisions worth calling out:
■ The studs become locating posts. The frame has corresponding pockets that drop over the studs in the corners. That gives us positional repeatability without separate alignment pins or screw bosses. The same studs that let you stack docks also center the tile frame.
■ Retention is snap-fit at the long edges. Two flexures on each long side engage matching ledges on the dock body. PETG flexes enough to install and remove tiles many times without fatigue. We sized the engagement at ~0.6 mm so the frame stays put under desk-knock loads but pops off cleanly with finger pressure.
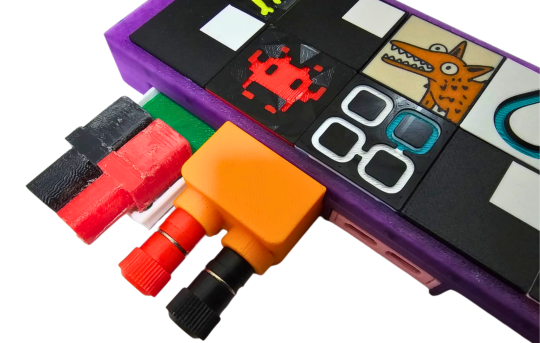
■ Tile-level airflow is a feature, not an accident. The frame leaves a small standoff above the case roof. That gap, plus a vented tile, gives a passive airflow path over hot Tool Cards. We measured the difference on a stress-loaded power supply card and it's not nothing.
End result: you can run the dock with the studs exposed (stacking, bricks, whatever), or click the frame on for a Framework-style tile face. Two layouts, one part-bin difference.
Big thank you to ForgeWork
We've been talking about Framework Desktop tiles in the abstract. The reason this post exists today is that ForgeWork shipped us a real box of their tiles to validate the frame against. They fit on the first try, with no rework. That's how we know our tile pocket geometry is right.
If you don't know them: ForgeWork is a small shop printing precision tiles for the Framework Desktop faceplate. The dimensional control is the part that matters from an engineering standpoint, the tile-to-pocket clearance is tight, and they hit it consistently across designs. From the box they sent:
■ Gyroid Vent. A 3x3 tile with an interior gyroid lattice. Functional heatsink geometry in a tile form factor. We will be putting this one over our power-supply Tool Card.
■ Hilbert's Tile. Hilbert curve fractal pressed into the tile face. Surprisingly tactile. We didn't put it down.
■ Floppy Tile and Faux Floppy Slot. Pure throwback. The slot version models a 3.5" drive bay. We laughed.
■ Omarchy / Hyprland / Nobara / LM Studio / VLC Cone. Distro and software pride for the front panel. They donate VLC Cone proceeds to VideoLAN. We respect that.
Thanks again, ForgeWork, for the tiles, for printing them well, and for proving the tile format has community legs.
You can find them at:
■ forgework.shop, full tile shop
■ @Forgework_ on X, new drops and shop updates
If you have a Framework Desktop, go grab a few. Once we ship DockFrame, the same tiles will live on the dock too.
Open sources
After the crowdfunding campaign closes, the entire mechanical and electrical design goes public. KiCad schematics and PCB, FreeCAD .FCStd files for the case, exported STEP and STL of the studded top and the tile frame, ESP32-S3 firmware, the multimeter and power-supply Tool Card sources. Same release model we used for webscreen.cc.
DockFrame is a modular USB-C hub for Framework laptop users, makers, and engineers. Open source hardware, open process. Find us on GitHub, join the Discord, or tell us what you want to see.

