
DIY Product Photography: Capturing Clear Shots of WebScreen with Just a Smartphone
Good product photos can make a big difference when showcasing your product to potential customers. At HW Lab, we've found a practical, DIY approach to capturing clear and accurate images of WebScreen using just a smartphone. Here's how we do it, along with some straightforward tips we've learned along the way.
1. Making the Most of Our Smartphone Camera
These days, smartphone cameras are surprisingly capable. With a few adjustments, we can highlight the essential features of WebScreen effectively.
Use Manual Mode: If your smartphone has a pro or manual mode, give it a try. Adjusting settings like ISO, shutter speed, and focus helps us optimize lighting and bring out screen details.
Shoot in High Resolution: We always use the highest resolution available to capture crisp, detailed images.
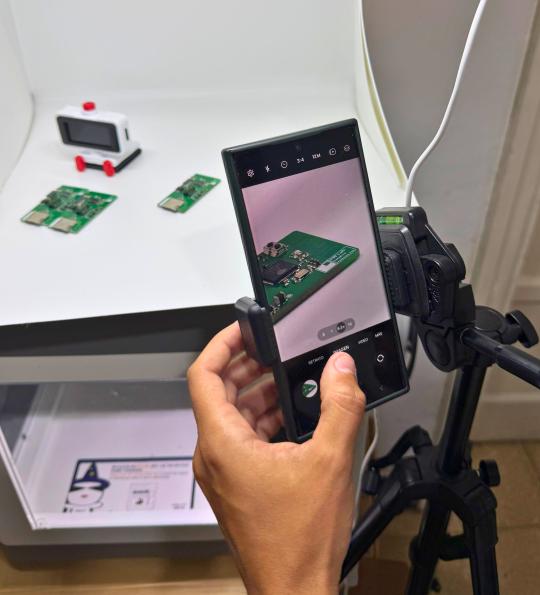
Keep It Steady: To avoid blurry photos, we use a tripod or rest the phone on a stable surface. This is especially helpful for close-up shots.
These simple steps help us produce polished images without investing in expensive equipment.
2. Working with Basic Lighting
Lighting plays a crucial role in photography, but it doesn't have to be complicated. We keep it simple by using natural light whenever possible and adding softbox lights when needed.
Position Your Light Source: Placing the light at a 45-degree angle to WebScreen helps minimize harsh shadows and reduces reflections on the screen.
DIY Diffuser: If the light is too harsh, we soften it by covering the light source with a thin white sheet or parchment paper. This diffuses the light, making it easier to capture the screen without glare.
Maintain Consistent Lighting: Using similar lighting setups for each photo ensures a cohesive look across all images, without the need for fancy equipment.
This straightforward approach to lighting works well for us and is easy to replicate.
3. Using a Simple Background
A clean background keeps the focus on WebScreen. We use readily available materials to create a distraction-free backdrop.
White Poster Board: A simple white poster or foam board provides a seamless, professional-looking background that doesn't detract from the product.
DIY Lightbox: For more controlled shots, we create a makeshift lightbox using a cardboard box lined with white paper. This helps diffuse light evenly around the product.
These affordable options help WebScreen stand out in every photo.
4. Capturing Key Angles and Details
We aim to highlight WebScreen's main features by keeping our shots straightforward.
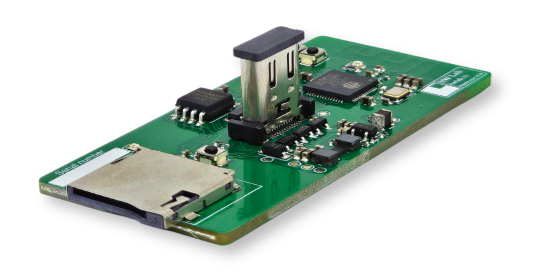
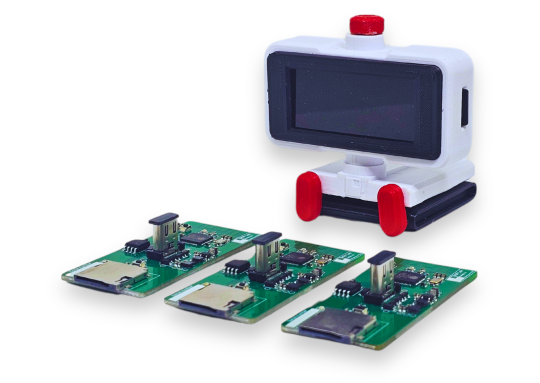
Front and Side Views: These angles showcase the screen, ports, and overall design.
Close-Ups: Zooming in on features like the AMOLED display and connection ports highlights the product's quality and functionality.
Lifestyle Shots: To provide context, we include photos of WebScreen in real-world settings, like on a desk or in a gaming setup. This helps customers envision how they'd use it.
We're not striving for complex compositions—just clear, direct photos that communicate what WebScreen is all about.
5. Simple Edits for a Clean Look
After capturing our photos, we use basic editing apps to polish them up.
Adjust Brightness and Contrast: Tweaking these settings can enhance details without overdoing it.
Remove Background Distractions: Apps like Snapseed allow us to easily edit out minor imperfections or unwanted elements.
Ensure Color Accuracy: We make slight color adjustments to ensure the display looks natural and true to life.
Our goal is to present clean, honest images that accurately represent the product.
6. Adding Props for Context
Occasionally, we'll include minimal props—like a keyboard, mouse, or notebook—to show how WebScreen fits into a typical workspace. We keep props simple to avoid clutter and keep the focus on the product.
7. Keeping a Consistent Style
Consistency helps make our images recognizable and professional-looking.
Consistent Lighting and Backgrounds: Using similar setups for each shoot creates a cohesive look across all photos.
Uniform Angles and Composition: Sticking to a set of standard angles makes our product listings and promotional materials look unified.
Even without a professional studio, these practices help us maintain a high-quality visual brand.
Conclusion
Our DIY approach to product photography shows that you don't need expensive gear to create effective images. With just a smartphone, some basic materials, and a bit of creativity, we're able to capture photos that showcase WebScreen's features and appeal.
For anyone looking to improve their product photos on a budget, these tips can help you get started. Remember, you don't have to be a professional photographer—patience and experimentation go a long way.
By focusing on simple setups, accessible equipment, and practical edits, we've learned that good product photography is within reach for anyone. Give it a try—you might be surprised at the results you can achieve with just a smartphone.

